Crosley Model CR12-10 Jukebox
Unpacking Instructions/User Guide
IMPORTANT
NOTICE: Please read the instructions before
connecting Jukebox to power source! Save all boxes and
packing material in case you need to return the Jukebox. Do not break or
destroy the foam packing. If item needs to be returned you will be responsible
for obtaining proper packing material and return shipping.
TO REMOVE
JUKEBOX FROM SHIPPING CONTAINER: The Jukebox
weighs about 100 pounds so it is best if you have two people to unpack the
unit. First, carefully stand the shipping box on the top side.
You will notice that the end of the box is taped on all sides. Take a small
knife and carefully slice through the tape to separate the inner bottom
section of the box from the outer container. You don't need to cut the
cardboard, cut only the tape. Next, carefully tip the unit first to its side
and then to the upright position. Now you should be able to lift the outer box
up and away from the Jukebox.
Next, carefully remove the foam packing
material from the top and sides of the unit, taking extra care not to break or
damage the foam, in case you need to return the Jukebox. Note:
You will find the CD magazine, remote control, external antenna, and catalog
with warranty information taped to the foam packing material. Remove them and
lay aside until you finish unpacking the unit.
To remove the plastic bag covering the
unit, carefully tip the Jukebox to one side and pull plastic free from that
side. Repeat for other side. To remove the foam supports from the bottom, tip
the Jukebox to the side only enough to allow removal of the foam from that
side. This is easier to do if you have one person tip the unit while the other
removes the foam packing. Repeat to remove packing from opposite side.
Remove the plastic safety cover
from the AC power plug. This product may be equipped with a
polarized alternating current line plug (a plug having one blade wider than the
other). This plug will fit into the power outlet only one way. This is a safety
feature. If you are unable to insert the plug fully into the outlet try
reversing the plug. If the plug should still fail to fit, contact your
electrician to replace your obsolete outlet. Do not defeat the purpose of the
polarized plug.
We
suggest that you keep all boxes and packing materials until your warranty has
expired. If you would need to return your product it is your responsibility to
provide proper packing for shipment to us.
Unpacking Storage Base:
Your Jukebox has a base (stand)
included that has a drawer for storing extra Music CD's and other accessories.
The base unit will be in a separate box. Once you have unpacked the Jukebox as
outlined above, you may unpack the base unit.
Learning the Controls and Program Functions
Please read
these instructions before attempting to operate your new
Jukebox!
This Crosley 2/3 scale CD Jukebox is the finest
replica of the most famous jukebox ever produced, the Wurlitzer 1015. Updated
for our times, this jukebox features a state-of-the-art Sanyo 10 compact disc
changer, an AM/FM radio, a full function remote control and a 42-disc storage
base. The Crosley Jukebox is also equipped with 4 speakers (Two 6.5" Dynamic
and Two 2.5" Tweeters). A thermostatically controlled cooling fan keeps the
internal components cool for hours of endless enjoyment. Each unit is
individually checked and tested extensively to meet the highest standards ofquality workmanship.
Features of the CR12-10 Include:
- Front Loading 10 Deck Compact Disk Changer
- Programmable Radio Station Presets
- AM/FM Radio with Electronically Assisted Tuner
- Percolating Bubble Tubes & Neon Lighting
- Dynamic Full Range Stereo Speakers
- External Speaker Outputs (Spring Clip Terminal Type)
- Thermostatically Controlled Cooling Fan
- External Antenna Connection
- Includes 42 Disc Storage Base
- 6 Months Parts and Labor Warranty
- Full Function Remote Control
- Approximate Size When Sitting on the Included Base is 54"h X 25.5"w X 15.25"d
|
NOTE: When you
unpack your Jukebox you will find the CD magazine, remote control, external
antenna, and catalog with warranty information enclosed. See picture of the
antenna below. Antenna connection is shown in photo at right. Note: This
is on the back of the jukebox. You must connect the antenna to the Jukebox
before the radio will work properly.
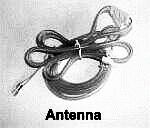 |
 Antenna: Connect and
extend antenna. See above photo.
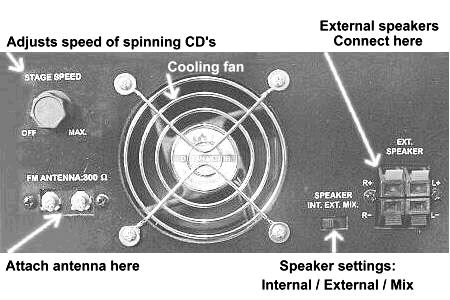
Speaker Settings: Check
to make sure that the speaker switch is set to the internal speaker setting
(INT.) unless you have external speakers connected.
Cooling Fan: The
cooling fan has a thermostat, and will run automatically as needed.
Stage
Speed: The jukebox has 3 spinning CD's in the stage window. This
adjusts the speed of the spinning CD's. Turning the control knob fully counter
clockwise will stop the CD's from spinning. Note: The lights must be
turned on before the CD's in the stage window will spin.
External
Speakers: These connections are provided for connecting external
speakers. If you will be using external speakers, move the speaker switch to
the "ext." position. Setting switch to "mix" will allow use of both internal
and external speakers at the same time. |
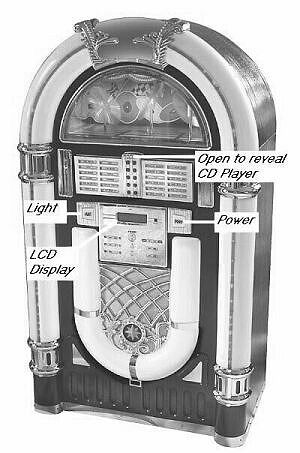 |
Photo to left shows the main control locations.
- Light: turns on the neon lights and bubble
tubes. Press once to turn lights on, press again to turn lights off. Note, that
the lights must be turned off before the AM radio will work.
- LCD Display: the digital display shows
selected mode ~ radio or CD player as well as song track, radio station frequency, volume level, etc.
- Open to Reveal CD Player: The song title list
conceals the CD Player. Push in at the top of the panel and gently pull to open.
- Power: turns on power to CD Player/Radio.
Press once to turn the power on, press again to turn power off.
|
A Special Note About Bubble Tubes
It takes several minutes for the
bubble tubes to begin bubbling after the jukebox has been turned on. Normally
they start bubbling within 10 or 15 minutes. If the bubbles don't start in that
length of time you can very gently tap on the bottom of the tube with your
fingernail to start the bubbling.
Your jukebox is equipped with four
"Bubble Tubes". Bubble Tubes have been used in jukeboxes since the 1940's.
Their bright bubbling appearance creates an enchanting display which adds color
and movement to your Crosley Jukebox. The tubes are filled with a liquid that
"boils" or bubbles at approximately 100 degrees. Each of the four tubes has a
small resistor at the base of the tube that provides the heat for the tube.
Small crystals in the bottom of the tube serve to concentrate the heat and
cause the bubbles. The tubes are very safe in their sealed environment, however
care should be taken not to jar or bend the tubes. If broken you should not
handle the fluid and you should make every attempt to clean up the liquid as
soon as possible. Like the neon in your Crosley jukebox, bubble tubes should
never wear out.
The "air" at the top of each tube is not air, but a
vacuum. The amount of vacuum may be greater or smaller at various times due to
atmospheric conditions and ambient temperature. The tubes must have the vacuum
at the top so that they do not shatter when heated. Although some of the vacuum
is hidden by the chrome pieces on the jukebox, it is considered normal to have
a small amount of vacuum or air space showing.
|
A quick look at the
control functions
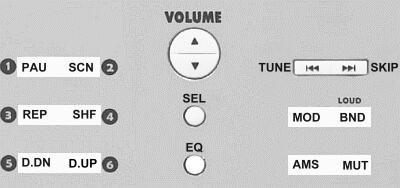
PAU ~ SCN: Press PAU to
pause CD play. Press SCN to play the first ten seconds of each track on
the selected disc.
REP ~ SHF: Press REP to repeat the
current disc. Press SHF to randomly play tracks on the selected
disc.
D.DN ~ D.UP: Press to
move to the previous or next disc.
Volume: Up/Down on volume
button is used to control the sound level of the CD Player and Radio. This
button also is used to control the level of Bass, Treble and speaker balance in
each respective mode. |
SEL: Press to select desired mode of Volume,
Bass, Treble, Balance. Then use the large Volume up/down button to change level
of selected mode.
EQ: Press equalizer button to select from
Flat, Classics, Pop Rock or DSP Off .
TUNE ~ SKIP: In CD mode,
use this button to return to a previous track or skip forward to the next track
on the selected disc. This button also tunes the radio in AM or FM
mode.
MOD ~ BND: Press the MOD button to toggle between CD
Player or Radio mode. Press the BND button to toggle between AM and FM in radio
mode.
AMS ~ MUT: AMS controls preset memory scan and auto memory
store. Press MUT to silence the sound. Press MUT again to recover previous audio level. |
Detailed Instructions For AM/FM Radio Use
- To select stations on the AM/FM radio push the
Power button to turn the unit on. Next press the mode button
MOD to select between CD or Radio mode. The LCD display will show
AM , F1, F2, or F3. NOTE: The F1, F2, etc. are not
different FM bands. There are actually only two bands, FM or AM. The numbers 1,
2, 3, on the FM band allow you to save up to six of your favorite stations in
each selected "band". You can also save up to 6 preset stations in the AM band.
- To select the first FM station press MOD
then press the BND button repeatedly to select F1. To tune within
the FM band press Tune or Skip button to tune down or
up the band. Press and hold either button for less than 1 second to
seek the first station with a strong signal. However, the seek
will miss many of the weaker stations. To manually search for stations, press
and hold the tune or skip button for more than two seconds. You will hear a
beep and see "Manual" display in the LCD window. Now repeatedly press the Tune
or Skip button to find the most stations. Release tune/skip button for more
than 5 seconds to reset "automatic" search.
- Saving your station to MEMORY: Now that you have
selected a station you may save it as one of your "Favorite Presets" so that
you can quickly return to it later if you wish. You will notice the buttons on
the left side of the control panel are numbered 1 through 6. The memory
function lets you save up to 6 of your favorite stations in each "band" mode. A
total of up to18 FM and 6 AM stations can be stored in the memory.
- If you have selected F1 as outlined above and are ready
to save your first station to memory, press 1 and hold it for at least 2
seconds. You will hear a "beep" to confirm that your station has been saved.
Now in the LCD display you will see that you are in section F1, your selected
station frequency is displayed in the center and on the right side of the LCD
your first saved selection is shown as "1". To add a second
preset station, use the Tune or Skip button to locate
the next station you want to save, then press and hold button number 2 on the
left side of the control panel. You may add up to 6 stations in the F1 section.
To save more stations, repeatedly press the BND button to advance
to F1, F2, F3, AM, etc. and repeat the above steps to locate and save more
stations. To listen to stations on the AM Radio band, repeatedly press the
BND button until you see AM . Then use the Tune and
Skip button to scroll through the AM stations. You may also save
up to 6 preset AM stations. Note: After programming your favorite
stations, your presets will be saved when you push the power button to turn off
the jukebox. However, if you unplug the jukebox from the wall outlet, the
memory will be cleared. Remember you must turn off the lights & bubble
tubes to receive stations in the AM mode.
- To locate your saved stations select the band by
pressing MOD to toggle between CD Player/Radio. Press
BND to scroll through band selections F1, F2, F3 and AM . If you
have stations saved at the F1 display, use button numbers 1 through 6 to find
stored channels in that section. Press BND to move to F2, then use
buttons 1 through 6 to scroll through the saved channels in the F2 location.
Repeat for each additional band mode. You can also let the system automatically
scan through your preset stations. To automatically scan your presets, press
the AMS button and hold for less than 2 seconds. When it reaches a station that
you wish to listen to, press AMS again to halt the scan.
- To adjust the Volume, Bass, Treble and Speaker Balance
press the round SEL button located near the center of the control
console. The LCD display will show VOL. Next press the arrow up or arrow down
located on the large Volume button. Hold until the desired sound
level is reached. The level will display in the LCD display window. To set the
BASS level press the SEL repeatedly until you see
BAS displayed on the LCD screen. Next use the large Volume button
to increase or decrease the BASS sound. The level range will display between
-10 through +10 in the LCD display window. Release the Vol button when the
desired level is reached. To adjust the Treble sound, repeatedly press the
SEL button until TRB is shown in LCD display. Treble
range is also -10 through +10. Press and hold the Vol up or Vol down button
until desired treble level is reached. To adjust the speaker balance press the
SEL button repeatedly until BAL is shown in the LCD
display window. Then press and hold the Vol up or Vol down until the desired
balance is reached. Range of 0 through 10 in each direction is shown in the
display window. You will see "BAL L=R" when speakers are at equal balance.
- EQ ~ Equalizer: This unit has a built in
equalizer that lets you fine tune the sound according to the type of music you
like. Pressing the EQ button (located in the lower center of the control panel)
results in the following changes: Flat, Classics, Pop, Rock or DSP Off. Press
the EQ button repeatedly to find the best sound quality for the type of music
you are listening to.
- AMS ~ Auto Memory Store/Preset Scan Features: To
automatically scan through your preset stations, press the
AMS button and hold for less than 2 seconds. This will start the
automatic scan which will search through all of the preset program positions.
Example: If you are listening to band F1, and press AMS, it will search the six
positions on F1 then skip to F2 and search all 6 positions then skip to F3,
etc. pausing for a few seconds on each program. When it reaches a station that
you wish to stop on, press AMS one more time to halt the search. The
AMS can also search for and save the stations it finds as preset
memory locations. To activate this feature, select any band mode, F1 through AM
then press and hold the AMS button for more than 2 seconds. The system searches
and stores the first six stations it finds in the preset memory locations for
that selected band. Example: if you selected F1 and started the
search, it stored the stations found as 1 through 6 in band F1. Press
BND to advance to the next band and repeat the search to store 6
more stations. Continue through all bands to store the maximum of 24 preset stations.
- Mute: To quickly silence the sound in either the CD
or AM/FM Radio mode, press the mute button MUT located in the lower
right of the front control panel. You will see "Mute" flash in the LCD window
if this function is activated.
Detailed Instructions For Using The CD Player
|
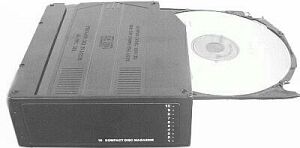 |
Loading discs into the magazine
Pull out one tray at a time and
place a CD on the tray with the CD label surface facing up. Next, slide the
loaded tray back into the magazine. Pull out the next tray and load the second
disc. Up to ten CD's can be loaded. NOTE: Always keep the CD cartridge bay
door closed, even as you unload the cartridge and are preparing to put new CDs
into it. Keeping the door closed will minimize the possibility of jamming the
cartridge. See the warning in the 3rd picture below for more details.
|
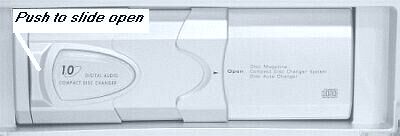 |
To load the magazine into the CD
player, slide the door to the right as shown in the photos. Check to make sure
that you have the magazine positioned so that the top side is up and that it is
pointed in the right direction for installation. You should be able to see the
writing and disc numbers on the front after it is inserted. |
 NOTE: Be sure to close door after you have
ejected or inserted the magazine. Dust or dirt can cause malfunctioning of the CD player.
NOTE: Be sure to close door after you have
ejected or inserted the magazine. Dust or dirt can cause malfunctioning of the CD player. |
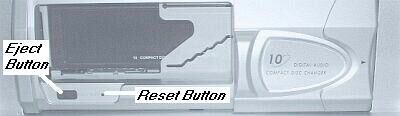
Push in until the magazine locks
into place. When the magazine is used for the first time, it will not lock into
place unless the power supply has been connected. You should hear the CD Player
cycle and begin to load a disc within a few seconds after the magazine is
locked into place. To eject the magazine, press the
eject button as shown in the photo at left.
|
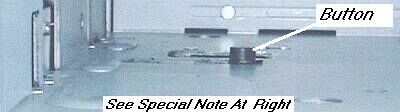 The photo above shows the inside of the CD
cartridge bay as it looks with the CD magazine removed. The stuck cartridge
condition noted at right only occurs if someone has moved the button.
The photo above shows the inside of the CD
cartridge bay as it looks with the CD magazine removed. The stuck cartridge
condition noted at right only occurs if someone has moved the button.
NOTE: Always keep the CD cartridge bay door closed, even as you unload the
cartridge and are preparing to put new CDs into it. Keeping the door closed
will minimize the possibility of jamming the cartridge. |
Warning: When the CD cartridge bay
is open do not put your hand or any other object inside. There is a small
button located on the left side, inside the cartridge holder. That button is
automatically positioned all the way to the right when the cartridge is
removed. If the button is moved to any other position it will cause the
cartridge to become permanently stuck when it is put back. This means you
cannot eject the cartridge. This is not a
warranty repair and it may be necessary to have a technician remove the CD
player and return it to us to be reset. |
To Play a CD Using The Buttons
on The Front Control Panel
- Push the Power button to turn the unit on.
- Next press the MOD button on the center control
panel to select CD mode. The LCD display will show CDC. The system will
automatically select and load the first disc. The current playing
disc will be shown in the center of the display screen. The
current playing track number is shown to the right on the LCD screen.
- Change tracks on the current playing disc: Press
the Skip button to move up to the next track or the
Tune button to move back to the previous track.
- Change to a different disc: Press the
D.UP button to move up to the next disc or the
D.DN button to move down to the next available disc.
- Repeat the current play track: Press the
REP button. Press again to cancel.
- Hear the beginning of each track: Press the
SCN button to hear at least the first 10 seconds of each track on
the selected disc. Press again to stop the scan.
- Random Play: Press the SHF button to let the
system randomly select and play tracks from the selected disc. Press again to cancel random play.
- Pause the CD playing: Press the PAU button. Press
again to resume play. Note: You can also press the mute button
MUT to pause and silence the CD play.
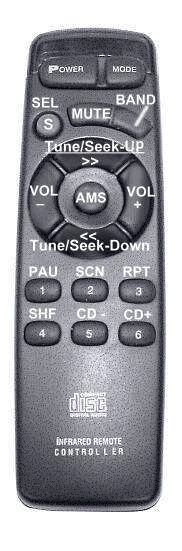 |
Using The Remote
Before using the remote you must
install 2 AAA sized batteries. Remove the cover from the back of remote and
install batteries with the + and - ends matching the diagram in the bottom of the battery tray.
- The Remote Controls theFollowing Functions:
- Power: Press to turn the Jukebox On/Off.
- Mode: The mode button selects between the CD Player or AM/FM Radio mode.
- Sel: With the system in either CD Player or
AM/FM radio mode, repeatedly press the select button to choose mode
of volume, bass, treble, or balance. Then use the Volume Down or
Volume Up button to decrease or increase the level of selected mode.
- Mute: Press mute to silence the sound from
either the CD Player or AM/FM Radio. Press again to restore sound to previous level.
- Band: The band button is used to navigate
through and select the band options, F1, F2, F3, and AM. Press repeatedly to
move through the selections. You can save up to 6 preset stations in each band.
- Tune/Seek-Up: Press to skip forward to the
next track in CD Player mode or to tune up in frequency in the AM/FM radio
mode. Press and hold the skip forward button for less than 1 second to seek
forward to the first station with a strong signal. However the seek will miss
many of the weaker stations. Press and hold button for more than 2 seconds to
switch to manual tune mode. Manual mode lets you scan through and find weaker
stations. Repeatedly press the Tune/Seek button to find the most stations.
- Tune/Seek-Down: Press to skip back to the
previous track in CD Player mode or to tune down in frequency in the AM/FM
radio mode. Press and hold the skip forward button for less than 1 second to
seek forward to the first station with a strong signal. However the seek will
miss many of the weaker stations. Press and hold button for more than 2 seconds
to switch to manual tune mode. Manual mode lets you scan through and find
weaker stations. Repeatedly press the Tune/Seek button to find the most stations.
- Volume Down and Volume Up: Press
to adjust volume level. Also see use of (SEL) select button description above.
- AMS: Controls preset memory scan
and auto memory store. To automatically scan through your preset stations,
press the AMS button and hold for less than 2 seconds. See section titled
Detailed Instructions For AM/FM Radio Use above for more information on
using the AMS function key.
- PAU: Press to pause CD play.
- SCN: In CD Player mode, press the scan button
to hear at least the first 10 seconds of each track. Press again to cancel action.
- RPT: In CD Player mode, press to repeat the
currently playing track. Press again to cancel action.
- SHF: In CD Player mode, press the shuffle
button to let the system randomly select and play tracks from the selected
disc. Press again to cancel action.
- CD - : In CD Player mode, press to move back
to a previous disc.
- CD + : In CD Player mode, press to move
forward to the next disc.
|
Using the Remote to Save Your Favorite Radio Stations to Memory
- You may use the remote to save your favorite stations to memory
so you can quickly return to them at a later time. You will notice the buttons
on the lower part of the control are numbered 1 through 6. The Memory function
lets you save up to 6 of your favorite stations in each "band" mode. A total of
24 preset stations can be stored in the memory.
- Use the MODE button to select radio mode. Then
press BND to select one of the available bands. For this example we will choose F1.
- Next, use the tune/seek forward or tune/seek back button to
scan through the stations and choose the first one to save. When you have
selected a station, press number 1 on the remote and hold it for at least 2
seconds. You will hear a "beep" when you press. This confirms that your station
has been saved. Now, you will notice in the LCD display you will see that you
are in section F1, your selected station frequency is displayed in the center
and on the right side of the LCD your first saved selection is shown as "1". To
add a second preset station, use tune/seek forward or tune/seek back button to
locate the next station you want to save, then press and hold button number 2
on the remote keypad. You may add up to 6 stations in the F1 section. To save
more stations, repeatedly press the BND button to advance to F2, F3, AM etc.
and repeat the above steps to locate and save more stations. You may save up to
6 stations in each "band". Note: After programming your favorite
stations, your presets will be saved when you push the power button to turn off
the jukebox. However, if you unplug the jukebox from the wall outlet, the
memory will be cleared.
- To locate your saved stations: Select the band by
pressing MODE to toggle between CD Player/Radio. Toggle to radio mode. Next
press BND to scroll through band selections F1 through AM. If you have stations
saved at the F1 display, use button numbers 1 through 6 to find stored channels
in that section. Press BND to move to F2, then use buttons 1 through 6 to
scroll through the saved channels in the F2 location. Repeat for each
additional band mode.
Troubleshooting Tips
- No Sound: Check the Internal/External speaker
switch on the back of the Jukebox and make sure it is set to the INT. (Internal
Speakers) if there are no external speakers connected. Also check
to make sure MUTE function is not enabled.
- Poor Reception or No Apparent Sound with Radio in AM or FM
Mode: The CR12-10 Jukebox uses an external antenna. If the antenna is
not connected to the 300 ohm receptacle on the back of the Jukebox, reception
of both AM and FM stations will be poor. In most instances especially in AM
mode with no antenna connected, it will seem as if the sound is not working.
- Bubble Tubes Not Bubbling: It can take the heaters
10 to 15 minutes to heat the liquid enough for bubble action to begin. If they
have not started after this amount of time, very lightly tap the
bottom of the tubes with your fingernail to start the tubes bubbling.
- The 3 CD's in Stage Window Do Not Spin: Check the speed
control knob on the back of the jukebox to make sure it is not turned fully
counter clockwise. Turning the knob in a clockwise direction will increase the
rotation speed. Note that the lights must be turned on for this feature to
work. If this does not correct the problem, please call for assistance.
- AM Radio and Bubble Tubes: Due to interference
caused by the Neon Lights, the AM Radio will only function properly with the lights turned off.
- CD Player Malfunctions With One of the following
problems:
(1) The loaded disc will not play or the system changes to
the next disc before the selected disc has a chance to play.
(2) The same
disc is played over and over again.
These symptoms usually occur when there
are burrs on the center hole or the outside circumference of the disc. Small
burrs can prevent the disc from loading properly. In most cases you can use the
side of a ball point pen or similar object to smooth the burrs.
- CD Will Not Play: You may need to clean the CD. Dirt or
scratches on the disc can prevent it from playing. Before assuming that the CD
player is the problem, test it with a commercially made CD.
Warning: Although there is a protective film being marketed as
a CD accessory, use of these products will result in malfunctions and should absolutely be avoided.

To reduce the risk of electrical shock, do
not remove the cover (or back).
No user serviceable parts inside. Refer servicing to qualified service personnel.
IMPORTANT SAFETY INSTRUCTIONS
PLEASE READ CAREFULLY ALL OF THE FOLLOWING IMPORTANT SAFEGUARDS THAT ARE APPLICABLE TO YOUR EQUIPMENT:
- Read Instructions: All the safety and operating
instructions should be read before the product is operated.
- Retain instructions: The safety and operating
instructions should be retained for future reference.
- Heed Warnings: All warnings on the product and in
the operating Instructions should be adhered to.
- Follow Instructions: All operating and use instructions should be followed.
- Cleaning: Unplug this product from the wall outlet
before cleaning. Do not use liquid cleaners or aerosol cleaners. Use a damp cloth for cleaning.
- Attachments: Do not use attachments not
recommended by the product manufacturer as they may cause hazards.
- Water and Moisture: Do not use this product near
water; for example, near a bath tub, wash bowl, kitchen sink, or laundry tub;
in a wet basement; or near a swimming pool; and the like.
- Moving Objects: A product and cart combination
should be moved with care. Quick stops, excessive force, and uneven surfaces
may cause the product and cart combination to overturn.
- Ventilation: Slots and openings in the cabinet are
provided for ventilation and to ensure reliable operation of the product and to
protect it from overheating. These openings must not be blocked or covered. The
openings should never be blocked by placing the product on a bed, sofa, rug, or
other similar surface. This product should not be placed in a built-in
installation such as a bookcase or rack unless proper ventilation is provided
or the manufacturer's instructions have been adhered to.
- Power Sources: This product should be operated only
from the type of power source indicated on the product label. If you are not
sure of the type of power supply to your home, consult your product dealer or
local power company. For products intended to operate from battery power, or
other sources, refer to the operating instructions.
- Grounding or Polarization: This product may be
equipped with a polarized alternating-current line plug (a plug having one
blade wider than the other). This plug will fit into the power outlet only one
way. This is a safety feature. If you are unable to insert the plug fully into
the outlet try reversing the plug. If the plug should still fail to fit,
contact your electrician to replace your obsolete outlet. Do not defeat the
safety purpose of the polarized plug.
- Power Cord Protection: Power supply cords should be
routed so that they are not likely to be walked on or pinched by items placed
upon or against them, paying particular attention to cords at plugs,
convenience receptacles, and the point where they exit from the product.
- Lightning: For added protection of this product
during a lightning storm, or when it is left unattended and unused for long
periods of time, unplug it from the wall outlet and disconnect the antenna or
cable system. This will prevent damage to the product due to lightning and power line surges.
- Power Lines: An outside antenna system should not
be located in the vicinity of overhead power lines or other electric light or
power circuits, or where it can fall into such power lines or circuits. When
installing an outside antenna system, extreme care should be taken to keep from
touching such power lines or circuits as contact with them might be fatal.
- Overloading: Do not overload wall outlets,
extension cords, or integral convenience receptacles as this can result in a risk of fire or electric shock.
- Object and Liquid Entry: Never push objects of any
kind into this product through openings as they may touch dangerous voltage
points or short-out parts that could result in a fire or electric shock. Never
spill liquid of any kind on the product.
- Servicing: Do not attempt to service this product
yourself as opening or removing covers may expose you to dangerous voltage or
other hazards. Refer all servicing to qualified service personnel.
- Damage Requiring Service: Unplug this product from
the wall outlet and refer servicing to qualified service personnel under the
following conditions: A: When the power-supply cord or plug is
damaged. B: If liquid has been spilled, or objects have fallen
into the product. C: If the product has been exposed to rain or
water. D: If the product does not operate normally by following
the operating instructions. Adjust only those controls that are covered by the
operating instructions as an improper adjustment of other controls may result
in damage and will often require extensive work by a qualified technician to
restore the product to its normal operation. E: If the product has
been dropped or damaged in any way. F: When the product exhibits a
distinct change in performance, this indicates a need for service.
- Replacement Parts: When replacement parts are
required, be sure the service technician has used replacement parts specified
by the manufacturer or have the same characteristics as the original part.
Unauthorized substitutions may result in fire, electric shock, or other hazards.
- Safety Check: Upon completion of any service or
repairs to this product, ask the service technician to perform safety checks to
determine that the product is in proper operating condition.
- Wall or Ceiling Mounting: The product should be
mounted to a wall or ceiling only as recommended by the manufacturer.
- Heat: The product should be situated away from
heat sources such as radiators, heat registers, stoves, or other products
(including amplifiers) that produce heat.
WARNING: Changes or modifications to this unit
not expressly approved by the party responsible for compliance could void the
user's authority to operate the equipment.
NOTE: This
equipment has been tested and found to comply with the limits for a Class B
digital device, pursuant to Part 15 of the FCC Rules. These limits are designed
to provide reasonable protection against harmful interference in a residential
installation. This equipment generates, uses, and can radiate radio frequency
energy and, if not installed and used in accordance with the instructions, may
cause harmful interference to radio communications. However, there is no
guarantee that interference will not occur in a particular installation. If
this equipment does cause harmful interference to radio or television
reception, which can be determined by turning the equipment off and on, the
user is encouraged to try to correct the interference by one or more of the
following measures: A: Reorient or relocate the receiving antenna.
B: Increase the separation between the equipment and receiver. C:
Connect the equipment into a circuit different from that to which the
receiver is connected. D: Consult the dealer or an experienced radio TV
technician for help.
|
Specifications for CR12-10 Jukebox
- Frequency Range FM: 87.5 - 108.5 MHZ
- Frequency Range AM: 525 - 1710 KHZ
- Power Source: AC 120 Volts
- Power Consumption: 130 Watts
- Antenna: External 300 ohm connection for AM/FM antenna
- Speakers: Two 6.5" Dynamic and Two 2.5" Tweeters
Design and specifications subject to change without notice. |