

|
|
|
|
|
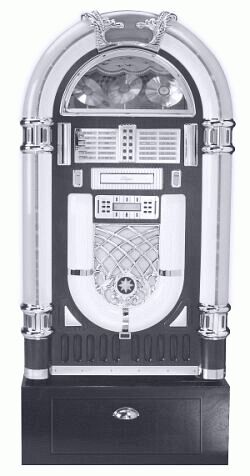
Crosley Model CR12-03 Jukebox
Unpacking Instructions/User Guide
IMPORTANT NOTICE: Please read the instructions before connecting Jukebox to power source! Save all boxes and packing material in case you need to return the Jukebox. Do not break or destroy the foam packing. If item needs to be returned you will be responsible for obtaining proper packing material and return shipping.
TO REMOVE
JUKEBOX FROM SHIPPING CONTAINER: The Jukebox
weighs about 100 pounds so it is best if you have two people to unpack the
unit. First, carefully stand the shipping box on the top side.
You will notice that the end of the box is taped on all sides. Take a small
knife and carefully slice through the tape to separate the inner bottom
section of the box from the outer container. You don't need to cut the
cardboard, cut only the tape. Next, carefully tip the unit first to its side
and then to the upright position. Now you should be able to lift the outer box
up and away from the Jukebox.
Next, carefully remove the foam packing
material from the top and sides of the unit, taking extra care not to break or
damage the foam, in case you need to return the Jukebox. Note:
You will find the remote control and catalog with warranty information taped to
the foam packing material. Remove them and lay aside until you finish unpacking
the unit.
To remove the plastic bag covering the unit, carefully tip the Jukebox to one side and pull plastic free from that side. Repeat for other side. To remove the foam supports from the bottom, tip the Jukebox to the side only enough to allow removal of the foam from that side. This is easier to do if you have one person tip the unit while the other removes the foam packing. Repeat to remove packing from opposite side.
Remove the plastic safety cover
from the AC power plug. This product may be equipped with a
polarized alternating current line plug (a plug having one blade wider than the
other). This plug will fit into the power outlet only one way. This is a safety
feature. If you are unable to insert the plug fully into the outlet try
reversing the plug. If the plug should still fail to fit, contact your
electrician to replace your obsolete outlet. Do not defeat the purpose of the
polarized plug.
We
suggest that you keep all boxes and packing materials until your warranty has
expired. If you would need to return your product it is your responsibility to
provide proper packing for shipment to us.
Unpacking Storage Base:
Your Jukebox has a base (stand) included that has a drawer for storing extra Music CD's and other accessories. The base unit will be in a separate box. Once you have unpacked the Jukebox as outlined above, you may unpack the base unit.
 |
Special Note: The CD Player
has two pieces of clear tape and a white tag across the front to protect it
from opening during shipment. You MUST remove this tag and tape before turning
on the power to the Jukebox. Failure to do so could damage the CD Player.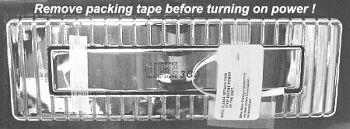
|
Learning the Controls and Program Functions
Please read these instructions before attempting to operate your new Jukebox!
Crosley has recreated the color and flash of the original 1940's Jukeboxes in a 2/3 scale size. The early originals played 78 or 45 rpm records and were limited to sound quality as compared to today's CD Players. The Crosley CR12-03 features a state-of-the-art 3 compact disc changer, an AM/FM radio, a full function remote control and a 42-disc storage base. The Crosley Jukebox is also equipped with 4 speakers (Two 6 1/2" Dynamic and Two 2 1/2" Tweeters) and appropriately vented to keep the internal components cool for hours of endless enjoyment. Each unit is individually checked and tested extensively to meet the highest standards of quality workmanship.
Features of the CR12-03 include:
The Light switch is located to the left of the CD Player and turns on the neon lights and bubble tubes. Note: Please allow 10 to 15 minutes for the bubble tubes to start. If they have not started after 15 minutes, you may very gently tap the bottom of each tube with your finger nail to start the bubble action.
The Power switch is located to the right of the CD Player and is used to turn on power for the CD Player and Radio.
External Speakers: These connections (located
on the back of the jukebox) allow connecting external speakers to the CR12-03.
If you will be using external speakers, move the speaker switch to the "ext."
position. The jukebox will not play both internal and external speakers at the
same time.
A special note about Bubble Tubes.
Your jukebox is equipped with four "Bubble Tubes". Bubble Tubes have been used
in jukeboxes since the 1940's. Their bright bubbling appearance creates an
enchanting display which adds color and movement to your Crosley Jukebox. The
tubes are filled with a liquid that "boils" or bubbles at approximately 100
degrees. Each of the four tubes has a small resistor at the base of the tube
that provides the heat for the tube. Small crystals in the bottom of the tube
serve to concentrate the heat and cause the bubbles. The tubes are very safe in
their sealed environment, however care should be taken not to jar or bend the
tubes. If broken you should not handle the fluid and you should make every
attempt to clean up the liquid as soon as possible. Like the neon in your
Crosley jukebox, bubble tubes should never wear out.
The "air" at the
top of each tube is not air, but a vacuum. The amount of vacuum may be greater
or smaller at various times due to atmospheric conditions and ambient
temperature. The tubes must have the vacuum at the top so that they do not
shatter when heated. Although some of the vacuum is hidden by the chrome pieces
on the jukebox it is considered normal to have a small amount of vacuum or air
space showing.
The CD Player Controls
Controls for the CD Player are located below the CD Player drive on either side of the LCD display window. See Photos and text below for more information on using the controls.Button functions are as follows:
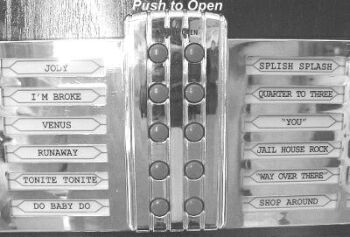
Push in at top of song title list frame, then gently pull open to reveal hidden controls. |
CD Operation
Step 1: Be sure to remove packing tape from front of CD player. The Radio Tuner / CD
Player select switch and the controls for the AM/FM radio are hidden behind the
song title list. Push in at the top to release latch, then pull down to reveal
the controls. When you receive your Jukebox the Tuner/CD switch will be set
on "Tuner." Leave it in this position until after you have powered up the
unit. See photos 3 and 4. |
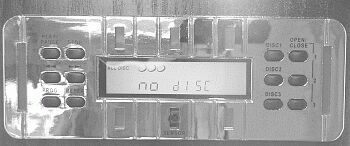
When you see the "NO DISC" displayed on the LCD screen, you are ready to proceed to Step 3. |
Step 2: Use the Tuner / CD switch to select CD. The display window on the CD Player will light up and you will hear the player begin to check for loaded CD's. You will see "all disc" displayed in the upper left corner of the LCD screen. Do Not push any buttons until the CD Player has had a chance to cycle through its search. This will take about 30 to 45 seconds to complete. When it has finished you should see "NO DISC" displayed on the LCD screen. |
Step 3: The Model CR12-03 Jukebox has a CD Player that holds up to 3 discs at a time. To insert a CD, press the Open/Close button located at the lower right of the front control panel. The CD bay will open and you will see each of the three trays. Insert a CD into the top #1 tray and push it back to allow access to the next tray. Load the other two trays in the same manner and when finished push the Open/Close button to close the CD bay door. Allow the unit time to cycle through and check for CD's loaded. When it has finished it will display "All Disc" in the display window. While a CD is playing, you can remove or replace the disc from the other CD trays.
Important: When using the CD Player, always give it time to finish each requested task before you give it the next command. Attempting to request more than one action at a time may result in it giving you an ERROR message on the LCD display. If you get an error message, turn off the power and start over.
Step 4: To start playing a CD press Disc 1, Disc 2, or Disc 3 to select your desired CD. Your selected disc will begin to play. To pause the current playing track, press the Play/Pause button. To continue playing, press Play/Pause again. The LCD display on the unit will show the current playing disc and track number. (Note: The number for the current playing disc will be flashing.) In addition, the elapsed time of the track is also shown in the same display section.
To advance to the next track on the
same disc, press the Forward Skip →→| button.
To go back to
the previous track on the same disc, press the Backward Skip
|←← button.
Volume: The
volume control is located on the front panel behind the song title list frame.
See photo #3. To increase volume, turn the knob to the right and hold it
there until the desired volume has been reached. To decrease volume, turn the
knob to the left and hold it there until the volume has decreased to the
desired level. Volume can also be adjusted using the included remote
control.
Repeat: Press Repeat in either the play or
stop mode to set the function. Press once to repeat track, press twice to
repeat disc, or press three times to repeat all three discs. You may confirm
your Repeat setting by looking at the LCD display. If the words
"All Disc" are displayed, the Repeat function is not set. If the words "1 Disc
Repeat" are displayed, it will repeat the track that is playing. If the words
"1 Disk Repeat All" are displayed, it will repeat the complete disk. If the
words "All Disc Repeat All" are displayed, it will repeat all loaded discs. To
clear the repeat function, continue to press the button until you see "All
Disc" but do not see the word "Repeat" in the center of the LCD.
Intro: Press Intro to play the first 10 seconds of
each track starting from Disc 1. When pressed during the play mode, the next
available track of the selected disc will start and carry forward to the rest
of the tracks on that disc, and then to next disc.
Select
Disc: To change playing disc, simply select from Disc 1,
Disc 2, or Disc 3 on the front control panel.
Change
Disc: The disc indicator on the LCD display shows the disc status. It
indicates the track loaded and shows which disc is playing, by flashing the
number for that disc. It also shows the track that is currently playing and the
elapsed time for the current track being played. To change or add different
discs during the play or stop mode, press the Open/Close button.
The CD bay will then open to allow you to remove or insert a CD into any
available tray. Press Open/Close again to close.
Step 5: CD Program Function: This function lets you play selected tracks in the order that you want to hear them. You may select from one disc or a combination of all three discs. The program can register up to 32 tracks at a time. NOTE: The program will automatically be cleared when you push the power button to turn the jukebox off, or if the jukebox becomes unplugged from the wall outlet.
To program your selections:
If you have a disc playing, first press the Stop button.
Next press Program. The LCD display will then show P-01. Make your selection by pressing Disc 1, Disc 2, or Disc 3 to select the disc that you want to play.
Next, select the track that you want to play by using the Skip Forward and Skip Back button to search through the tracks on the disc. The current track number will be shown on the left side of the LCD display. When you find the track that you want to add, press Program again. The LCD display window will show your selected tracks (on right side of display) as you add them.
To select the next track to add, press the Skip Forward or Skip Back button to navigate through the tracks on that disc, or press the Disc 1, Disc 2, or Disc 3 button to move to the next disc. Then use the Skip Forward or Skip Back button to navigate to the selected song on that disc.
When you have selected the next track you want to add, press Program again. The display will show the number of memorized tracks such as P-01, P-02 and so on. Continue this process until you have added all the tracks that you want to enter. You may enter up to 32 tracks.
To play your programmed tracks, press the Play/Pause button. The current disc playing and the track number will be flashing in the LCD window as the songs play.
NOTE: When all of your programmed tracks have been played, the CD Player will Stop unless you have the Repeat enabled. To begin the selected play over, press the Play/Pause button. To clear the programmed play, press the Stop button twice.
NOTE: The program will automatically be cleared when you push the power button to turn the jukebox off, or if the jukebox becomes unplugged from the wall outlet.
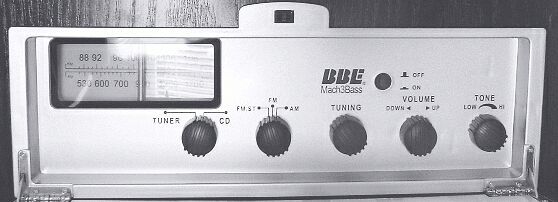
AM / FM Radio ~ BBE Mach 3 Bass Controls
Step 6: Turn the unit on by pressing the main Power switch located on the front of the Jukebox. Set the function Tuner/CD control switch to the Tuner position. Select the desired sound level by turning the Volume control. Turn and hold switch until desired sound level has been reached, then release. You may also adjust volume with the Remote Control. Select the wave band by setting the FM ST / FM / AM switch to the desired position. Turn the Tuning knob to select the desired broadcast station. To enhance the sound quality, press the BBE Mach 3 BASS button to activate the function.
Turn the radio off by switching the Tuner/CD switch back to the CD position. Turn the Jukebox power off by switching the Power button to the off position.
NOTICE: Due to interference caused by the neon lights, the AM Radio will only work with the lights off.
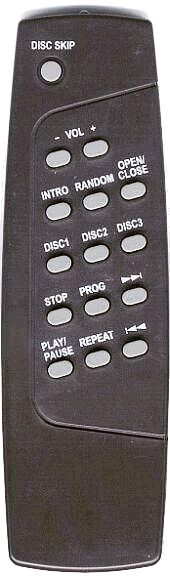 |
Before using the remote you must install 2 AAA sized batteries. Remove the cover from the back of remote and install batteries with the + and - ends matching the diagram in the bottom of the battery tray. The remote will control the following functions on the CR12-03:
|
Troubleshooting Tips

To reduce the risk of electrical shock, do
not remove the cover (or back).
No user serviceable parts inside. Refer servicing to qualified service personnel.
IMPORTANT SAFETY INSTRUCTIONS
PLEASE READ CAREFULLY ALL OF THE FOLLOWING IMPORTANT SAFEGUARDS THAT ARE APPLICABLE TO YOUR EQUIPMENT:
WARNING: Changes or modifications to this unit
not expressly approved by the party responsible for compliance could void the
user's authority to operate the equipment.
NOTE: This
equipment has been tested and found to comply with the limits for a Class B
digital device, pursuant to Part 15 of the FCC Rules. These limits are designed
to provide reasonable protection against harmful interference in a residential
installation. This equipment generates, uses, and can radiate radio frequency
energy and, if not installed and used in accordance with the instructions, may
cause harmful interference to radio communications. However, there is no
guarantee that interference will not occur in a particular installation. If
this equipment does cause harmful interference to radio or television
reception, which can be determined by turning the equipment off and on, the
user is encouraged to try to correct the interference by one or more of the
following measures: A: Reorient or relocate the receiving antenna.
B: Increase the separation between the equipment and receiver. C:
Connect the equipment into a circuit different from that to which the
receiver is connected. D: Consult the dealer or an experienced radio TV technician for help.
|
Product Specifications ~ CR-12-03
Design and specifications subject to change without notice. |

|
|
|
|
|
||||||
| Copyright © 2005 DCW Store. All rights reserved. | ||||||
| Privacy Policy Security Resources |
